Practice makes perfect!!..so here is a tutorial on how to do a simple photo manipulation technique. It is called Wraps and Blends technique. Is semi-advanced so if you are new to Photoshop then you will have difficulty understanding this. Any Questions please feel free to ask me.
Anyways you will need a photo and a texture.
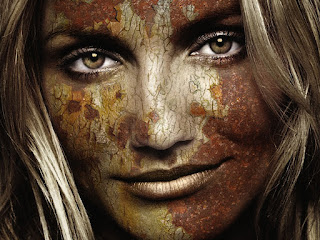
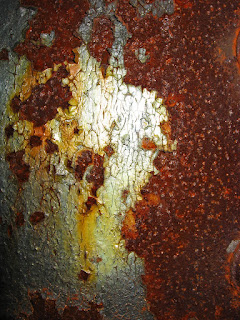
Below are my choices, you can work with anything you want, either with your own photos or web images. You can search for textures on the web too. so lets get going. The images below are the final manipulated image, the texture(rusty) and the unedited image of Cameron Diaz(one of my favourite actresses.

Here is how:
Open a texture you want to use
*Then instead of going to 'open' go to 'place' & open the face photo you want to use (X-Y...means the dimensions/across & down) Hold the shift key down while dragging the corner of you pic - to make the photo bigger or smaller to fit to the texture (Holding the shift key down makes the photo stay in proportion-if you don't it can end up wider / longer on one side & it will look out of proportion)
*When it is the right size-hit enter-then right click on the photo layer & select rasterize layer
*You should have 2 layers
*Duplicate both layers
*You now have 4 layers......starting from the very top-we'll call that layer 1.....
Layer 1 - Face
Layer 2 - Texture
Layer 3 - Face
Layer 4 - Texture
*Set the top layer to "Multipy"......set the other 3 to "Normal"
*But play around with these, it varies from photo to photo-sometimes
*Erase parts of the eye/mouth from Layer 1 & 2 to leave Layer 3 showing through......the rest is just trial & error....
*Adjust brightness/contrast/levels/curves
*Use dodge/burn tools to lighter & darker areas on different layers
****Save your work & fiddle around (that's where most of my skill comes from, just from fiddling & trying everything! :)
It's hard to put actions into words, but hoping this has helped!!


0 comments:
Post a Comment